Connecting to Dosya with WebDAV
Create a WebDAV key, copy your workspace address, connect a client and verify a sample upload in the writable All folder.
Last reviewed
Open Integrations → WebDAV in the intended workspace and copy its address. Connect using WebDAV over HTTPS, your account email as the username and a full dos_… API key as the password. For a normal workspace connection, open All before uploading: the other collections at the connection root are read-only views.
Before you start
- Sign in to Dosya and select the workspace you want to reach. Your workspace role must allow WebDAV and the file operations you intend to use.
- Use a WebDAV client that supports HTTPS and username/password authentication. The walkthrough below uses Cyberduck on macOS; another client’s fields may have different names.
- Decide whether the client only needs listing and downloading, or also uploads and file management. Keep a separate key for this client so you can replace or revoke it independently.
- Prepare a harmless, uniquely named sample file for your first transfer. Keep your original local copy while checking the destination.
- This connection is for ordinary workspace files. Vault uses its own workflow and is not exposed through WebDAV.
Steps: create the client’s key
- Open Profile → API keys. Select New API key. Enter a recognizable label in What is it for?, such as the client and computer name.
- Choose What can it do? Select Read only for listing and downloading. The upload walkthrough needs Full access, which also permits moving and deleting within your account’s allowed reach. Upload only cannot list folders, so it is unsuitable for this browsing workflow.
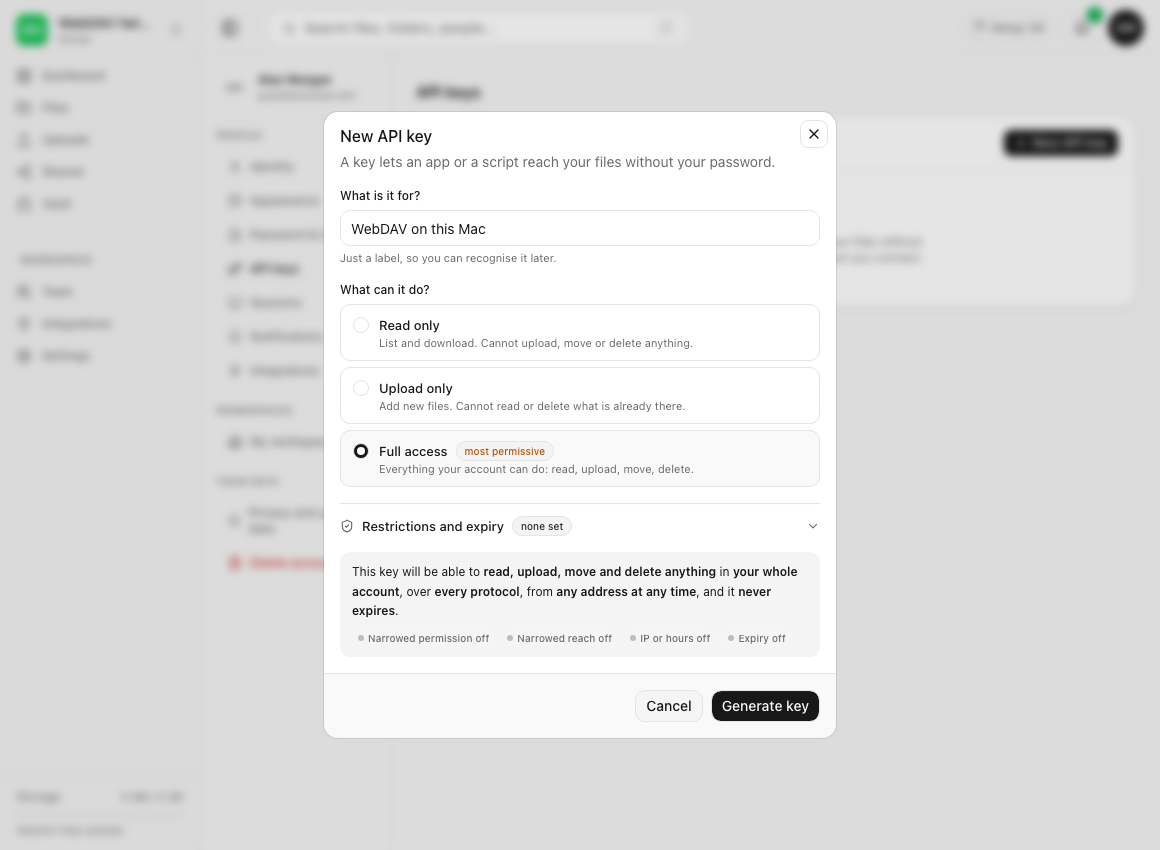
- Limit its protocols and workspace. Open Restrictions and expiry. Under Where can it reach? → Protocols, select Only the ones I pick and check WebDAV. Choose the intended Workspace. Review any expiry, address, schedule or usage limits you set; those restrictions continue to apply in the client.
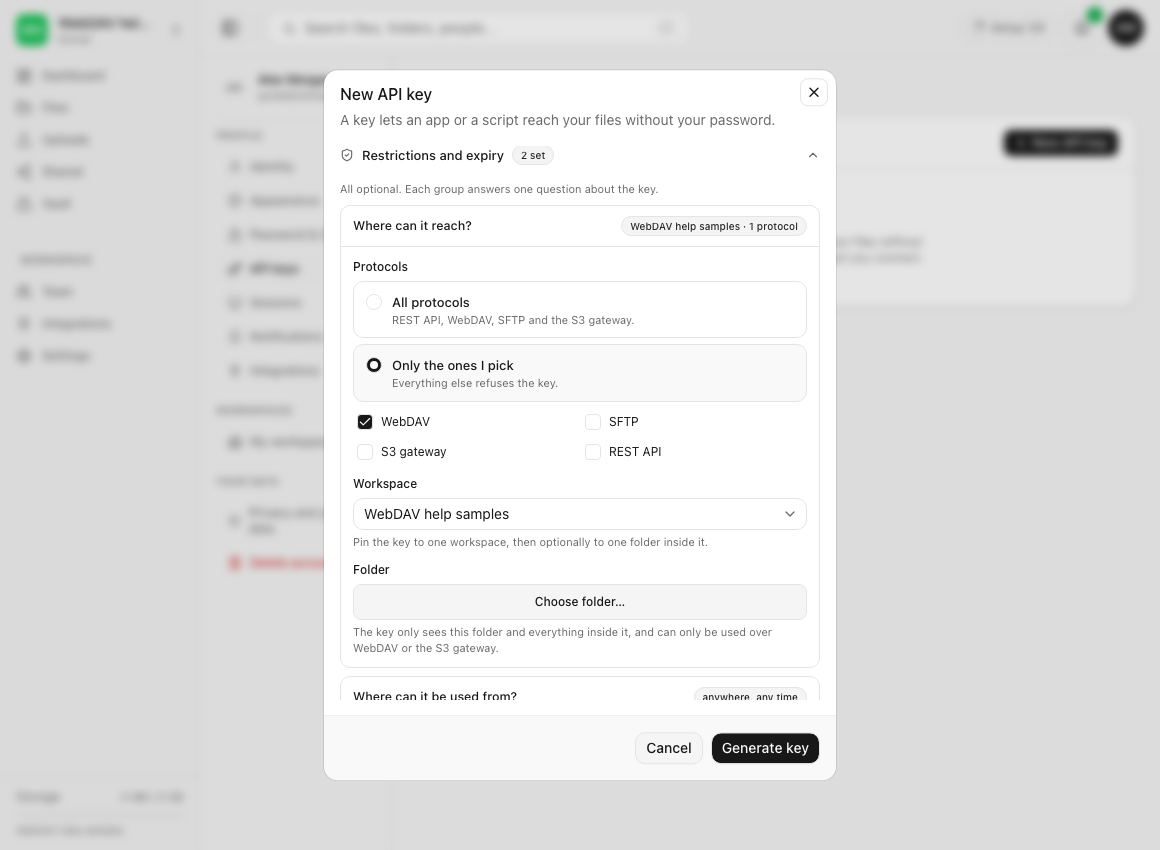
- Generate and save it privately. Check the form’s summary, then select Generate key. Copy the full key from the result dialog before selecting Done; it is shown only once. The label and prefix in the saved list cannot authenticate a client. See Creating and managing an API key for the complete key workflow.
Steps: connect to the workspace
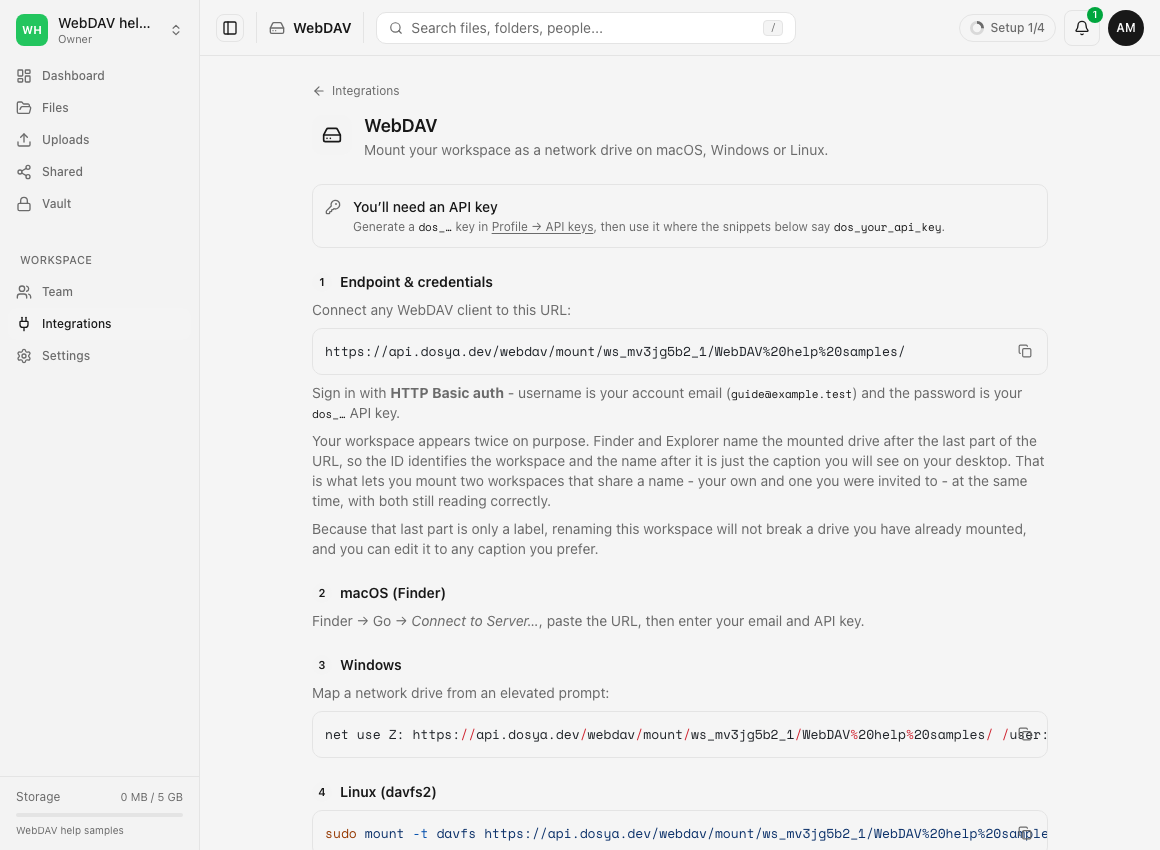
- Copy the workspace address. Return to Integrations → WebDAV and copy the URL under Endpoint & credentials. Copy the complete address, including its path and trailing slash. The workspace ID selects the workspace; the name segment supplies the connection’s label. Keep encoded spaces such as
%20when copying a URL.
- Open the client’s connection dialog. In Cyberduck, select Open Connection and choose WebDAV (HTTPS). If your version calls it WebDAV (HTTP/SSL), that is its secure WebDAV option. Cyberduck’s WebDAV documentation explains HTTPS authentication.
- Enter the address and credentials. If the client accepts a complete URL, paste the copied address. If it separates the settings, use the following fields. In Cyberduck, enter the path in Path; it is separate from Server.
| Field | What to enter |
|---|---|
| Protocol | WebDAV over HTTPS |
| Server | api.dosya.dev |
| Port | 443 |
| Path | Everything after the host in your copied URL, including /webdav/mount/…/ |
| Username | The email of the account that owns the API key |
| Password | The full dos_… API key |
Leave Anonymous Login off. Use your API key in the password field, rather than your account password or a share-link password. Save the credential in the client’s private credential storage only if that is appropriate for this computer.
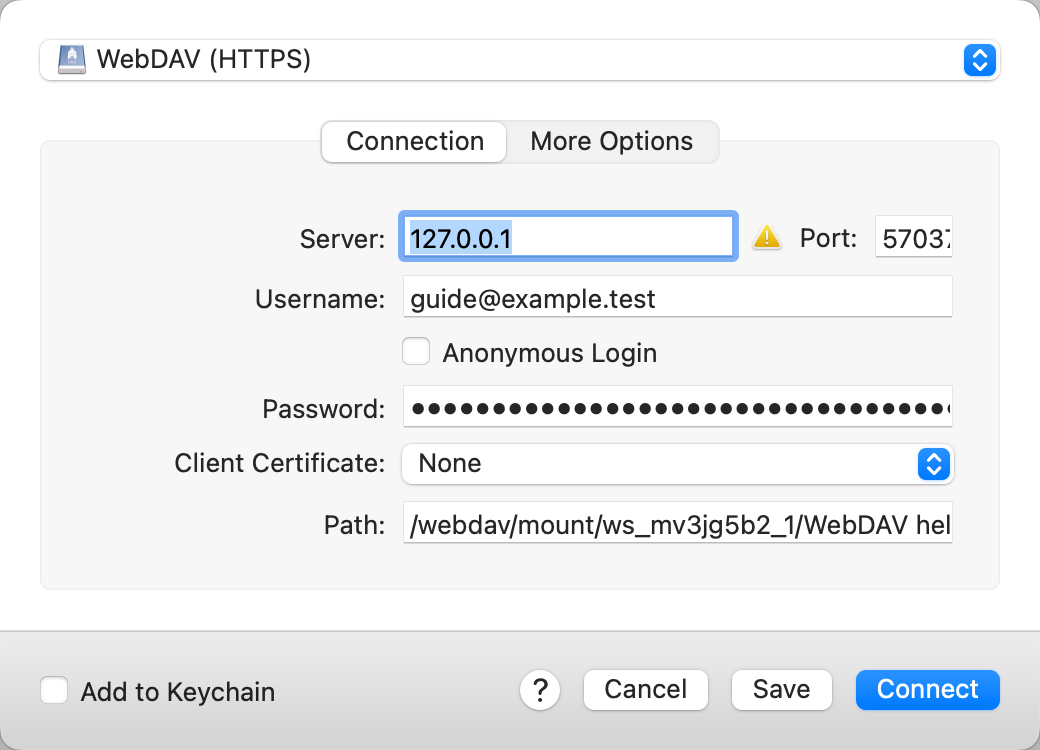
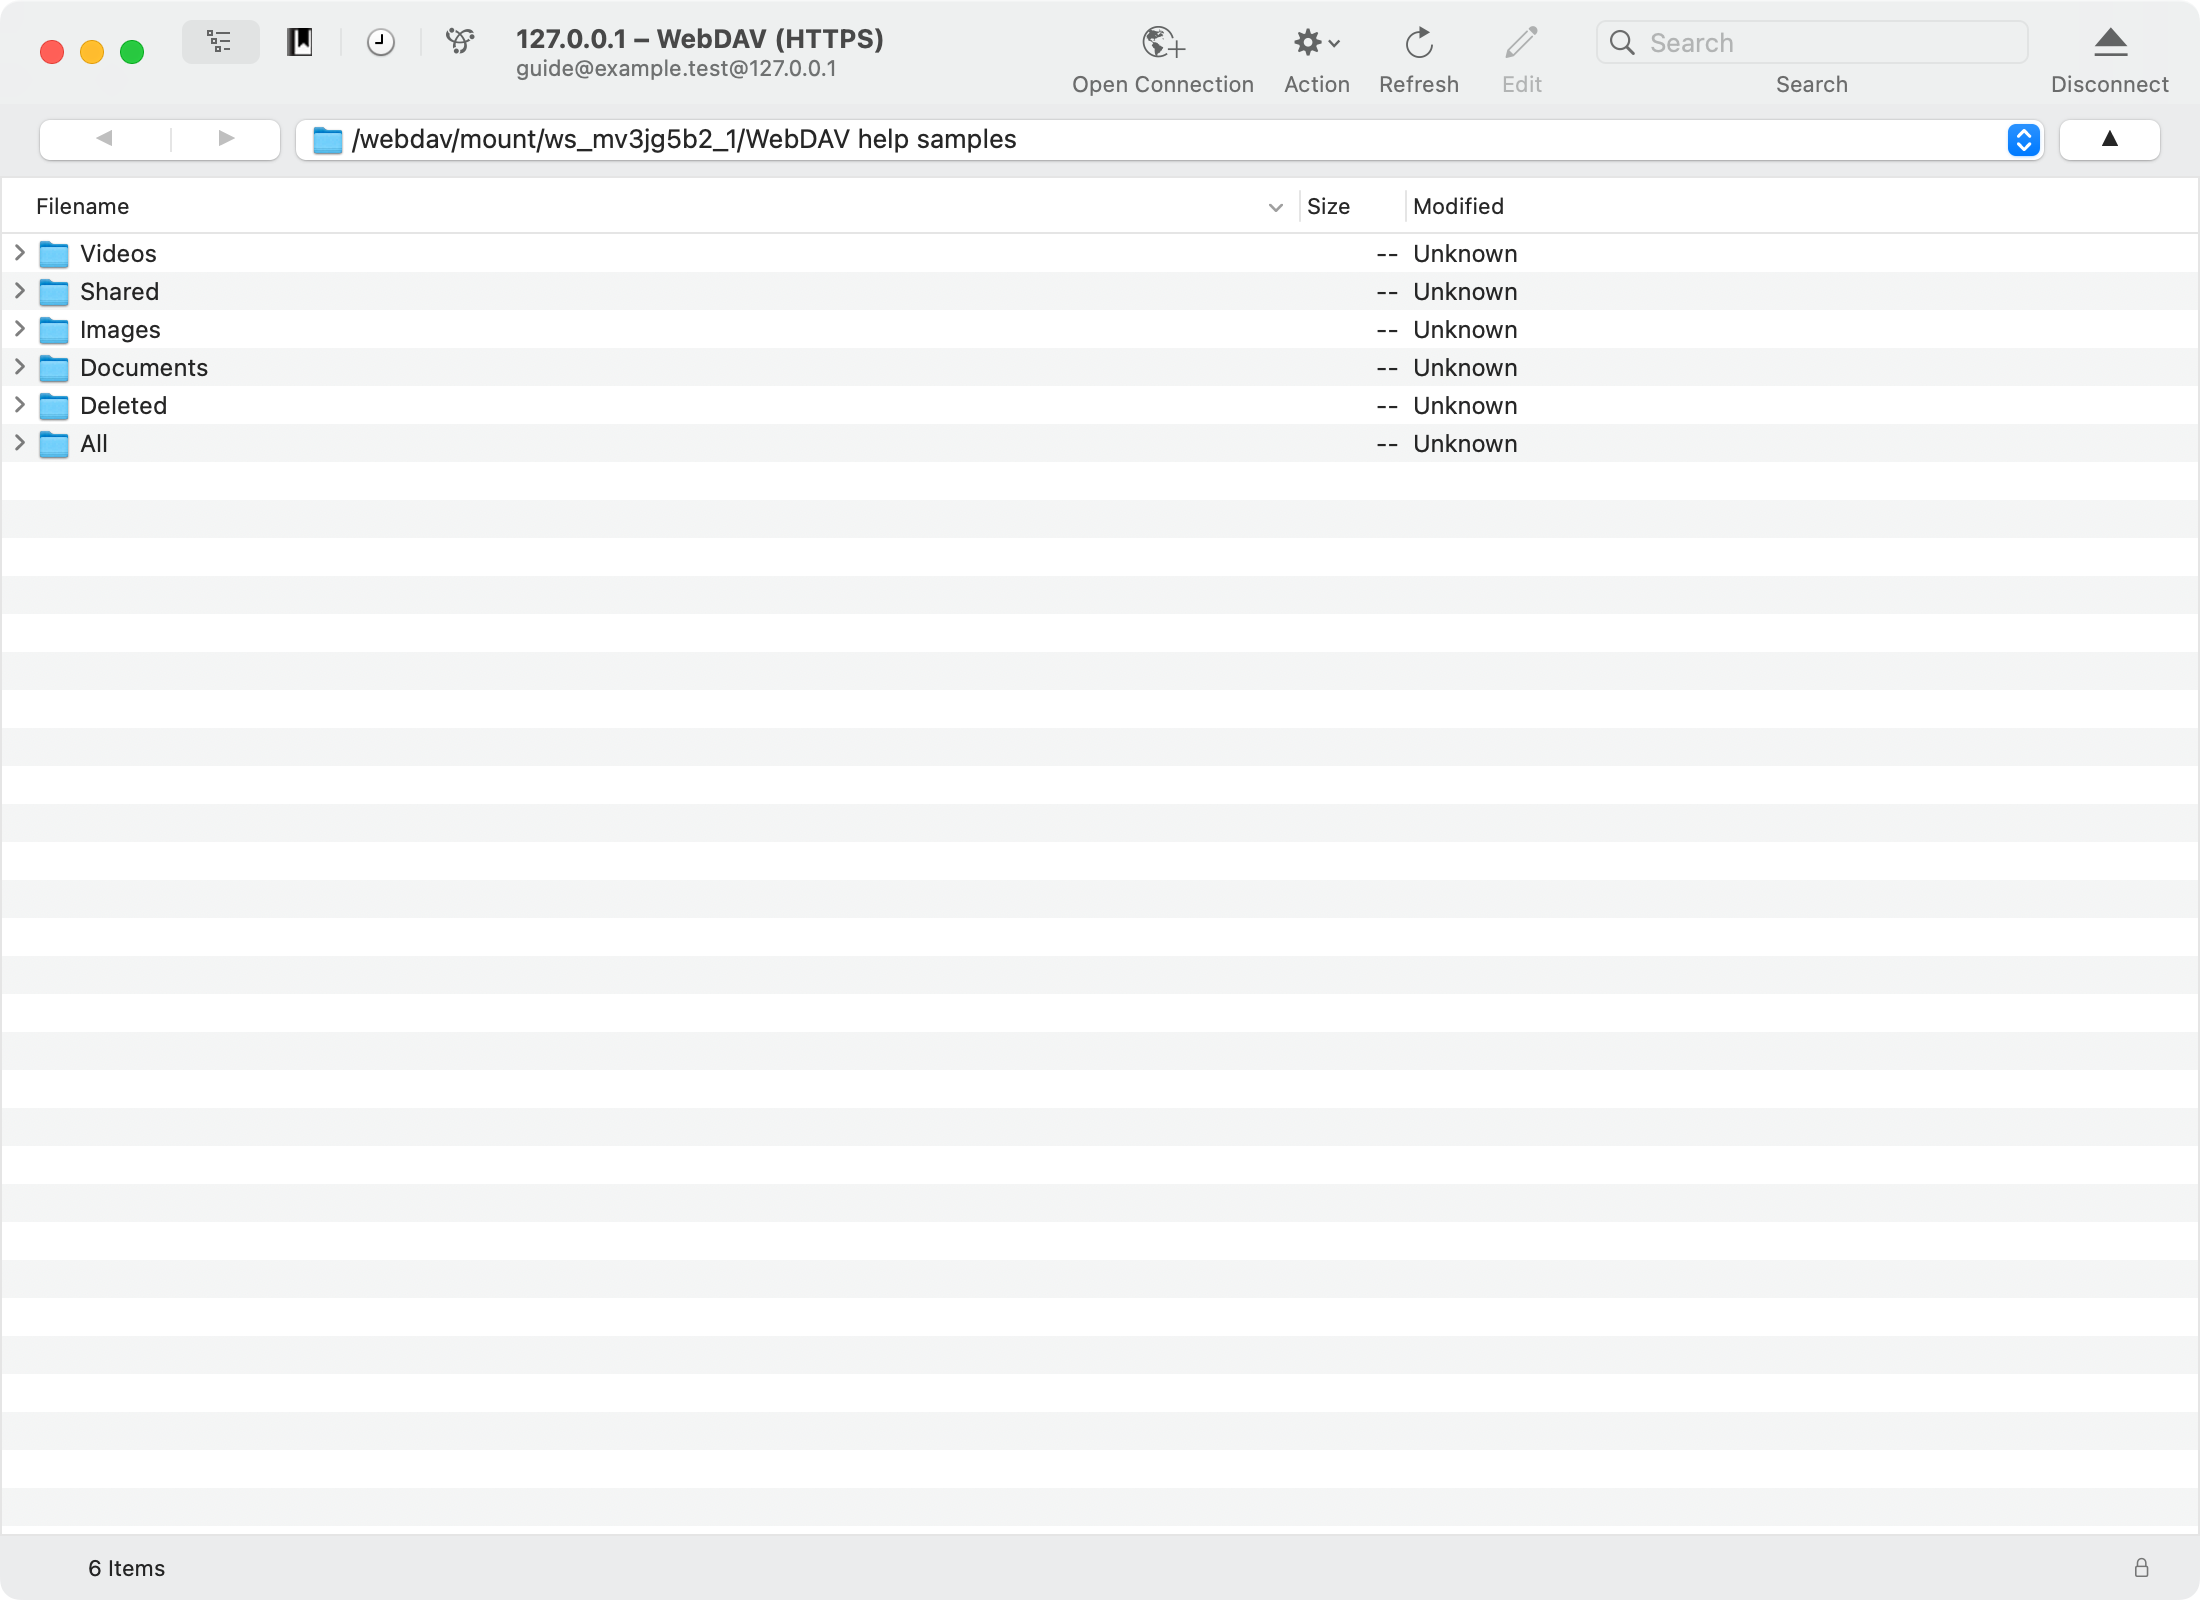
- Connect and inspect the result. Select Connect, and enter the same email and API key if a login dialog follows. For a normal workspace connection, the root lists All, Documents, Videos, Images, Shared and Deleted. Open All to browse the real folder tree and choose an upload destination.
Steps: verify a sample transfer
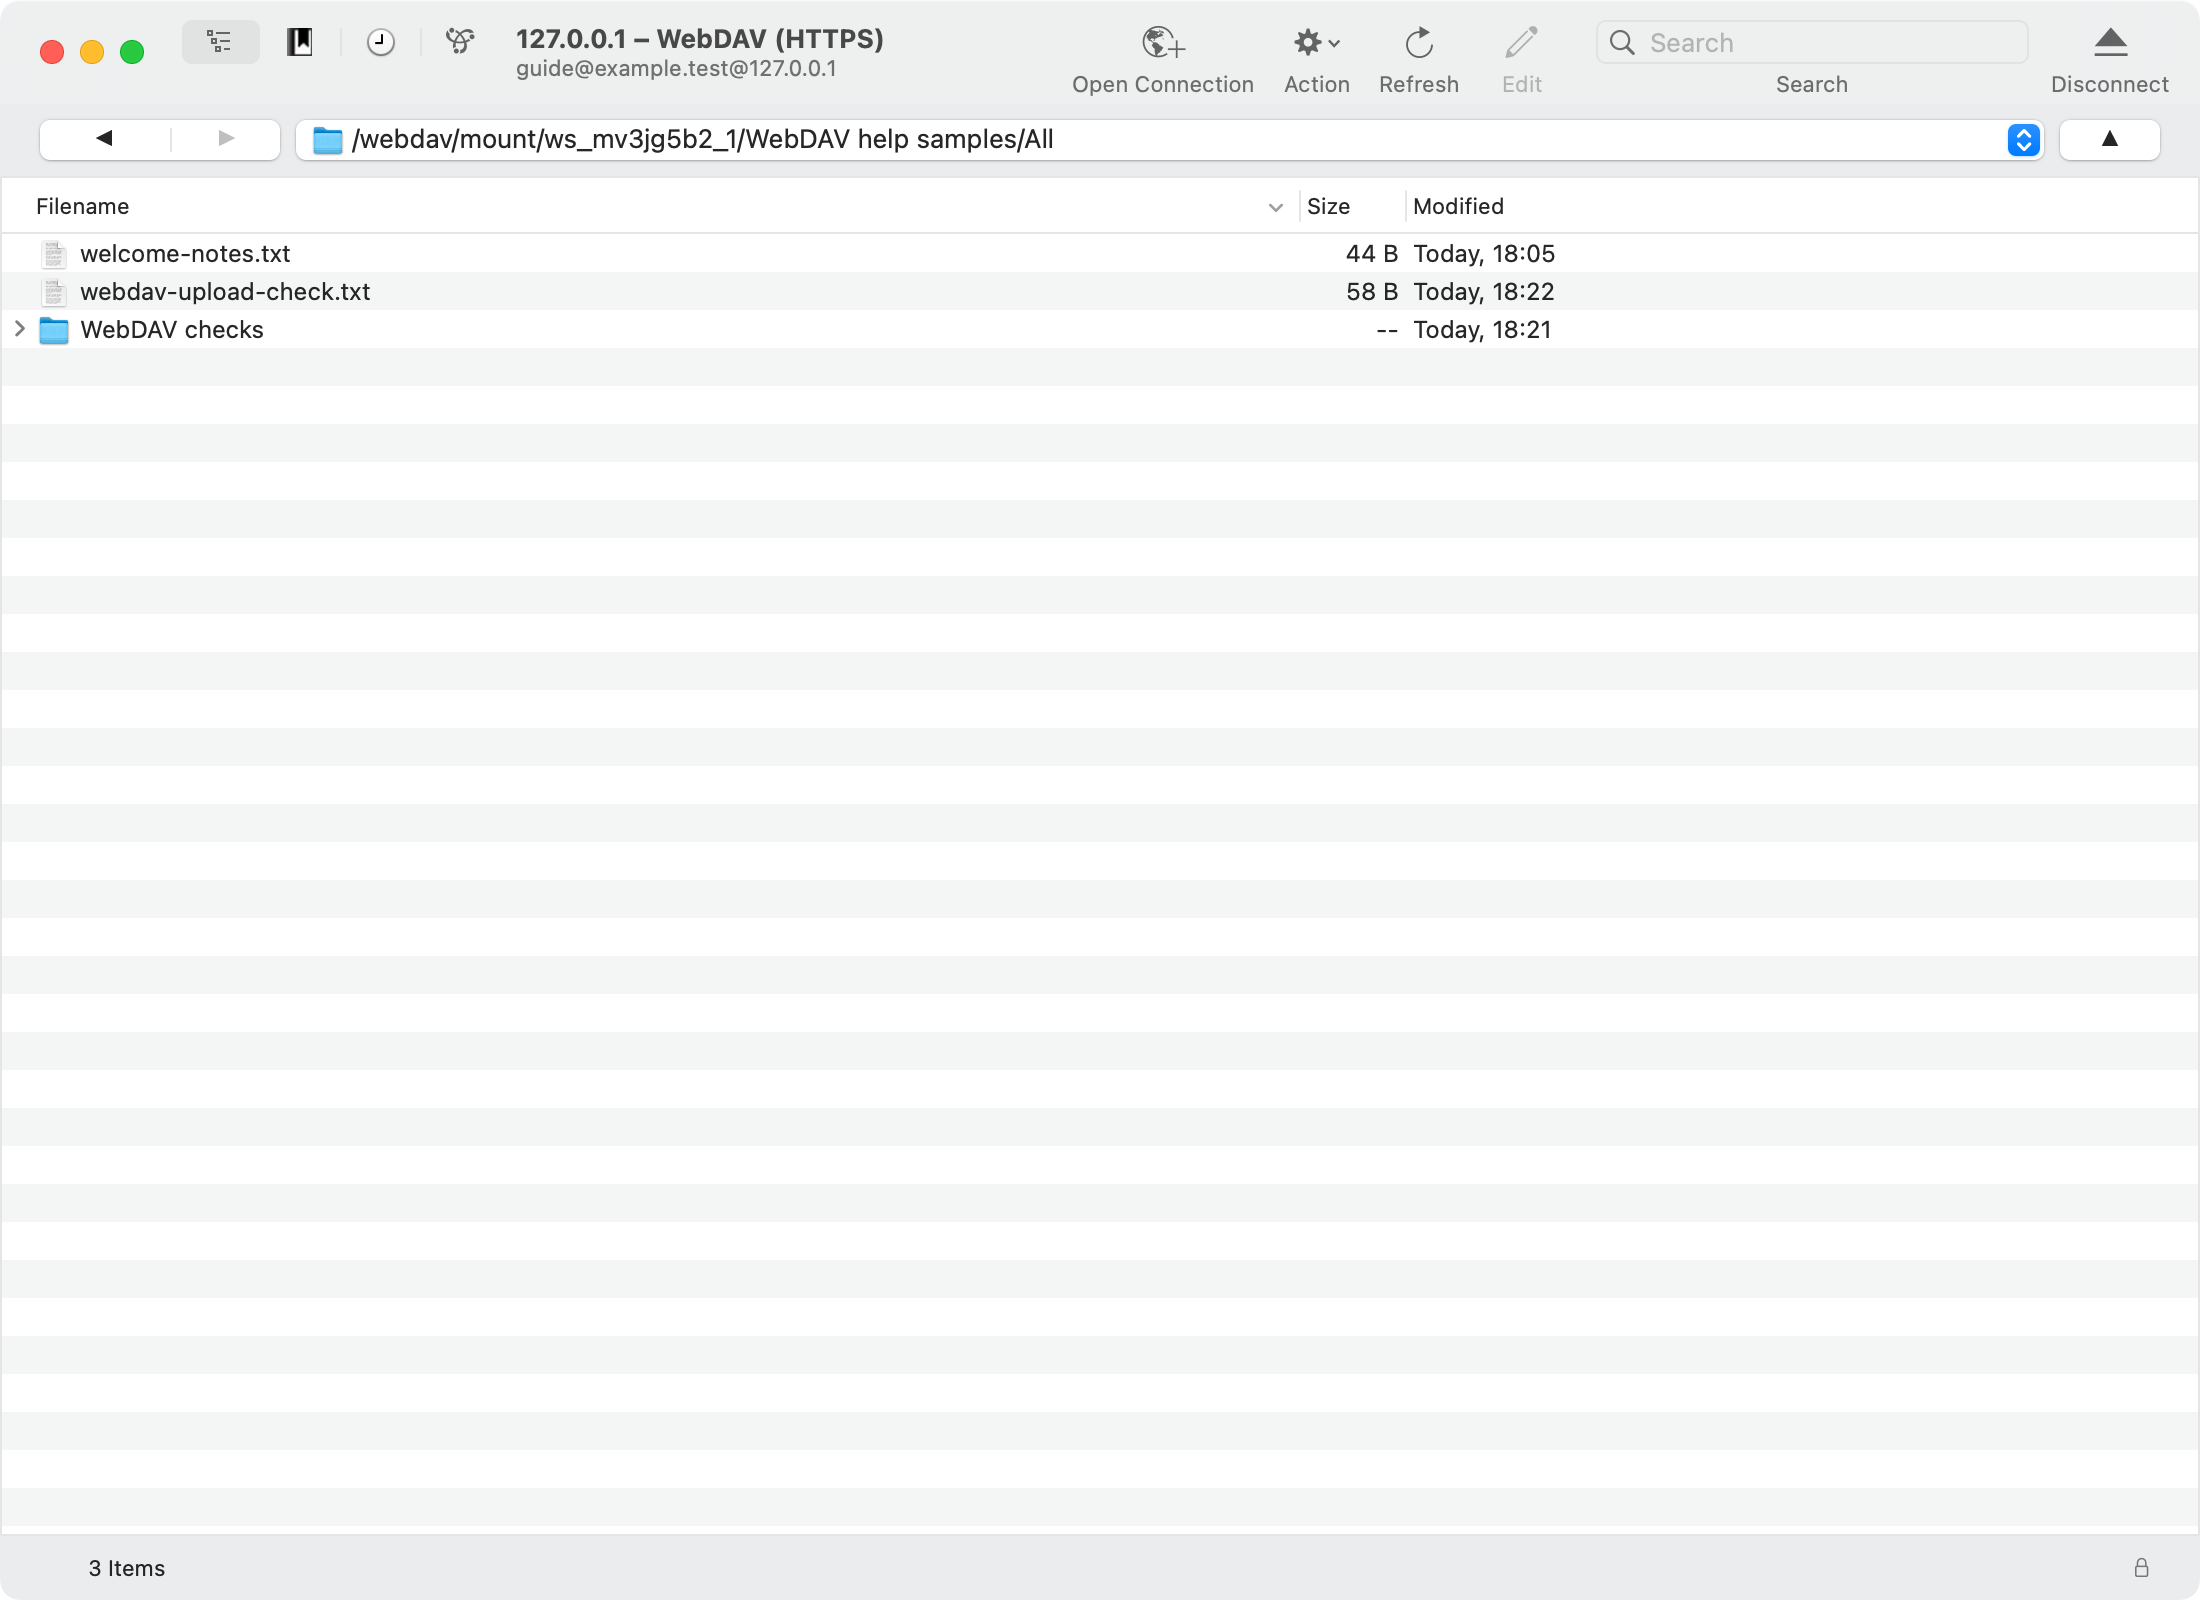
- Choose the destination in All. Use All itself for the ordinary workspace root, or open the intended folder beneath it. You can create a sample folder if your key and workspace role allow it. The connection root and the five smart views are not upload destinations.
- Upload the sample. In Cyberduck, use File → Upload… and select your uniquely named local sample. Wait for the transfer to finish. Avoid replacing an existing filename during this first check.
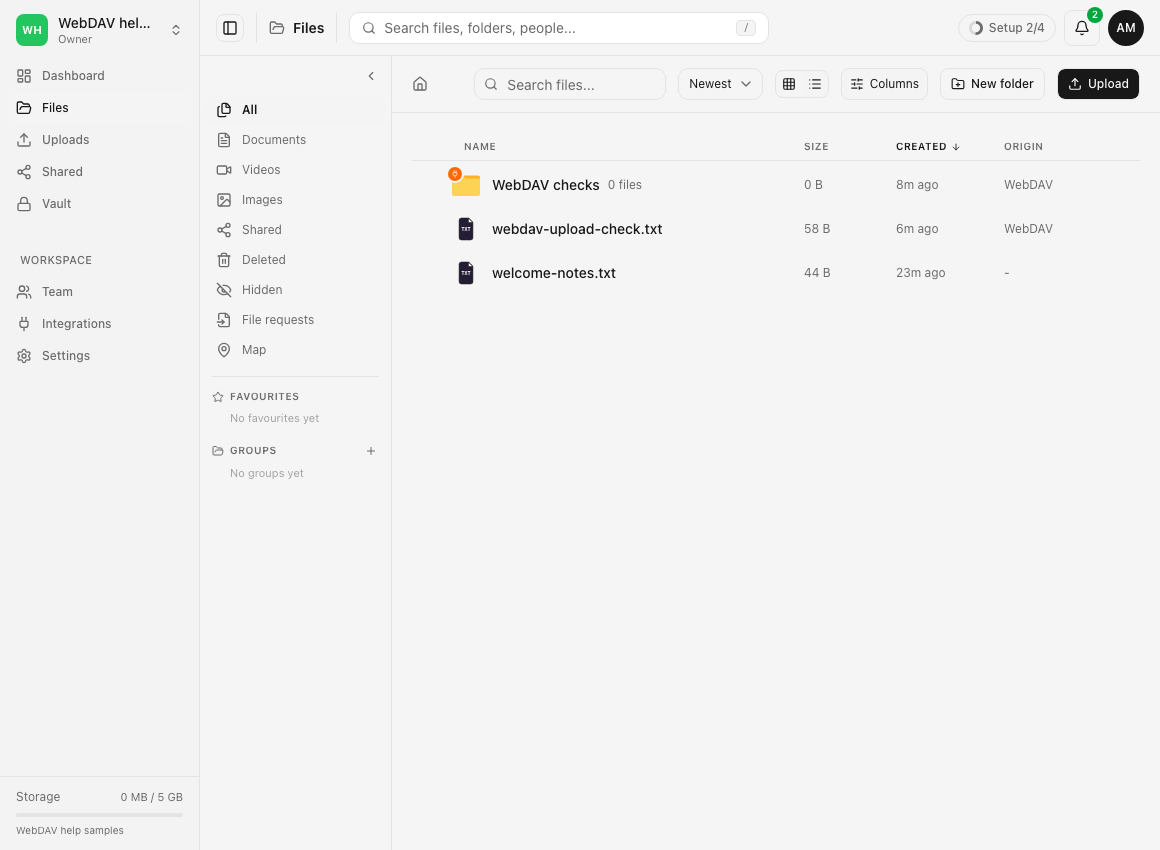
- Verify it in Dosya. Open Files in the same workspace and folder, refresh the listing if needed, and confirm the sample’s filename and size. WebDAV’s All collection corresponds to the ordinary workspace folder tree; it is not an additional folder you need to find in the web app.
- Check a downloaded copy. Download the sample through the client into a separate local location and open your own copy. Confirm that it is the file you expected before relying on the connection for other work.
Expected result
The client displays the intended workspace folders. With the required permissions, the sample appears in both the client’s All tree and Dosya’s Files listing, and your downloaded copy matches your source.
Disconnecting the client ends that connection; it does not remove your cloud files or revoke the key. Reconnect using the saved address and credential when needed. A WebDAV connection by itself does not set up a desktop folder-sync pairing or guarantee offline copies. See Desktop folder sync if that is your intended workflow.
Folder-restricted keys and other limits
If you select Choose folder… when creating a workspace-pinned key, that folder becomes the connection root. Its children appear directly, so the normal All and smart-view collections are absent. Use the workspace’s copied mount address; do not append the anchor folder’s name as if it were above this new root. Folder-anchored keys work over WebDAV and the S3 gateway, and are refused over REST API and SFTP. Moving the anchor to Trash makes that connection unavailable until the folder is restored.
Key permissions do not grant additional workspace-role permissions. A successful login therefore does not guarantee permission to upload, create folders, move or delete. Key expiry, selected protocols, allowed addresses, active hours, usage limits and workspace storage limits also apply.
The walkthrough above is for Cyberduck. A Finder or Explorer mount uses different controls and client-specific behavior; use the existing WebDAV mounting tutorial and protocol reference for those alternatives.
Troubleshooting
The client repeatedly asks for a password or reports Unauthorized. Use the key owner’s account email and the full API key. Check whether the key expired or was revoked. A copied label or prefix is insufficient. Replace a lost key using Profile → API keys, update the client and revoke the old credential as appropriate.
The client reports Forbidden. Check the key’s Permission, Protocols and Reach, and confirm that your workspace role allows WebDAV. A workspace-pinned key cannot connect to a different workspace. Address and schedule restrictions can also refuse a valid credential. If a role needs changing, ask the workspace owner or administrator.
Listing works, but uploads fail. Use All or a folder beneath it for an ordinary connection. Documents, Videos, Images, Shared and Deleted are read-only views. Check whether the key is Read only, whether your role permits uploads, and whether the destination is locked or has reached a limit. A missing parent folder must be created first.
Only one folder’s children appear, without All. Check whether the key or your workspace membership is folder-restricted. The folder is the connection root; its absence from its own listing is expected.
The server or workspace cannot be found. Copy the current address from the intended workspace’s integration page. Keep the workspace ID and full path, rather than using a bare host or guessing a workspace name. If the service reports temporary maintenance or a rate limit, wait for the stated retry period.
The client shows a certificate warning. Stop and check that you used the copied HTTPS address and the intended host. Do not bypass an unexplained certificate warning to make a production connection succeed. Record the message for private support.
The client looks successful, but the destination is missing. Check the active workspace and folder in both interfaces, refresh the lists, and inspect the client’s transfer result. Confirm the actual destination and your downloaded copy instead of relying only on a connection or completion message.
For a persistent problem, contact private support with the client/version, selected protocol, operation and error message. Omit your full API key, password field, authorization headers and private filenames from shared screenshots.
Frequently asked questions
Do I use my Dosya account password?
No. Use your account email as the username and the full API key as the password. The key must allow WebDAV.
Can I upload into Documents or Images?
Those root collections are read-only views for an ordinary workspace connection. Upload into All or an intended folder beneath it.
Can I restrict this client to one folder?
Yes. Choose a workspace and folder when creating its key. That folder becomes the connection root; the workspace-wide collections are not shown.
Does this connect my Vault?
No. WebDAV exposes ordinary workspace files. Use Dosya’s Vault workflow for Vault content.
Related guides
Was this helpful?
Loading helpfulness results…
Voting saves a necessary ballot cookie for up to 180 days so you can change your answer.
Questions and replies
Ask about the steps in this guide. Questions are reviewed before publication.
Keep account details, credentials and private files out of public questions. Use private support for those.
Loading questions…
Sign in to your Dosya account to ask a question.