Uploading files and folders to Dosya
Choose your destination, upload files or a whole folder in the web app, and confirm that the upload completed.
Last reviewed
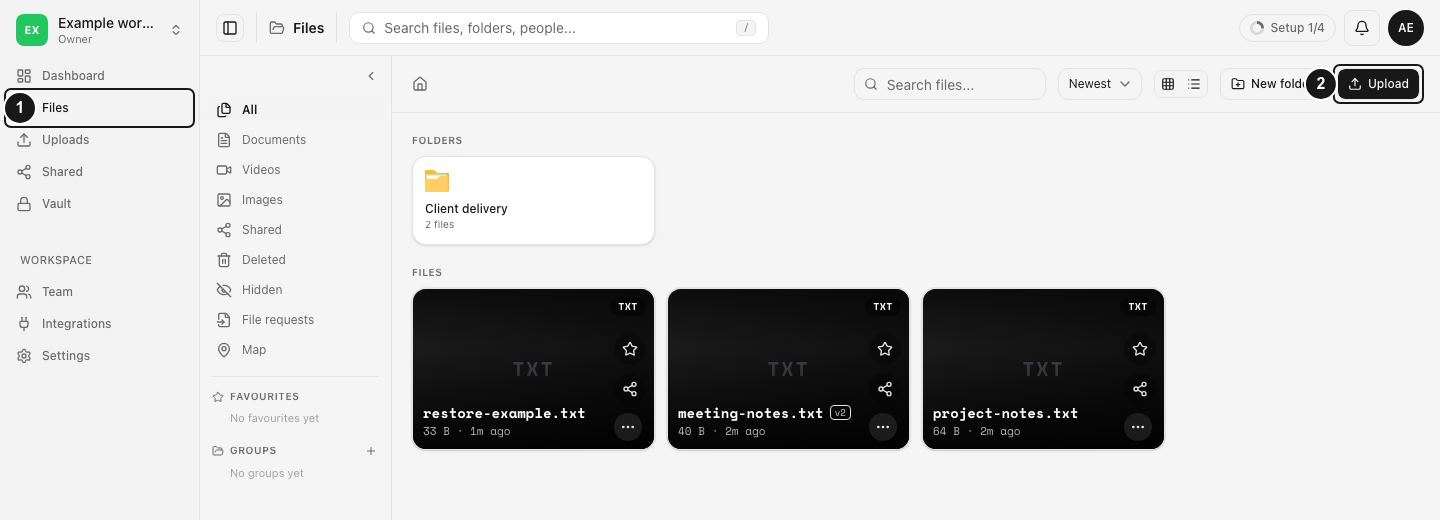
Open Uploads, choose the destination under Upload options → Folder, then use browse for files or pick a folder. Wait for Done in the upload queue before checking or sharing the uploaded files.
Before you start
- Sign in to the Dosya app and select the workspace that should receive the files.
- Your role needs permission to upload. The workspace also needs enough available storage and must allow your submission under its upload policies.
- Keep the original files available on your device and the browser running until the transfer finishes. Avoid changing the source files during the upload.
- These steps cover ordinary workspace storage. The Vault has a separate encryption workflow; selecting a file on this page does not automatically make it a Vault upload.
Steps: choose the destination
- Open Uploads. Select Uploads in the app navigation. The page heading is Upload files. You can also open Uploads directly, or select Upload in the Files toolbar.
- Check the workspace. Confirm the workspace selected in the app’s workspace switcher. Files go into that workspace, so choose it before starting a new batch.
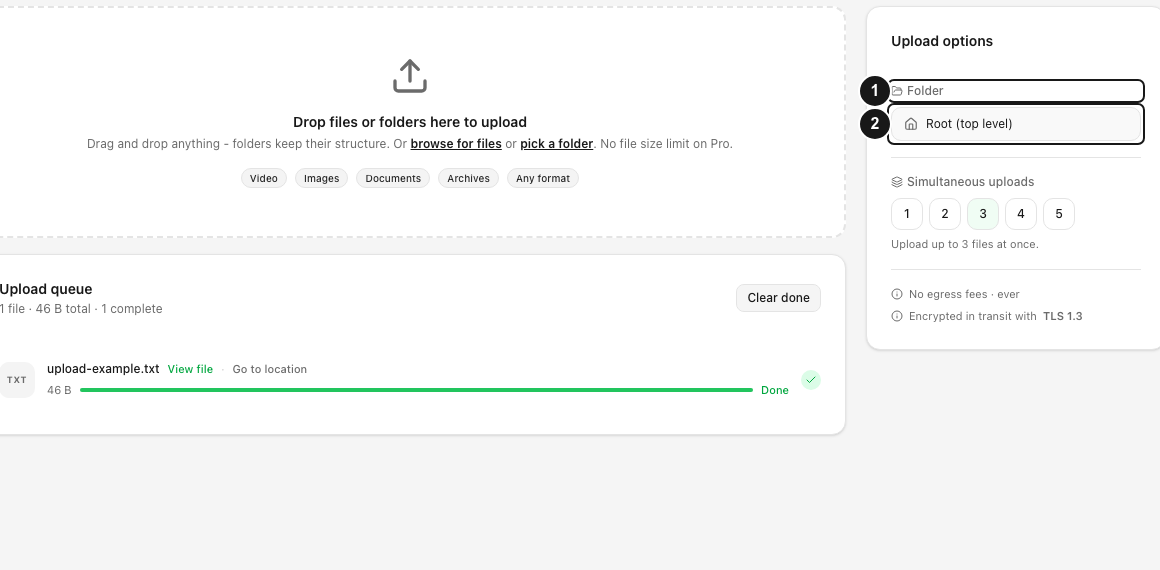
- Choose the folder. Find Upload options, then Folder. The folder button initially shows Root (top level) unless a destination was supplied when you opened the page. Root means the workspace’s top level.
- Confirm a different destination if needed. Select the folder button, choose a folder in Select folder, and confirm with Select folder. Check the updated folder name before adding files. A destination change applies to new files you add, rather than relocating a batch already queued.
Steps: add files or a folder
- Pick individual files. Select browse for files in the drop area, or select the drop area itself. Choose the files in your device’s picker and confirm the selection.
- Or pick a whole folder. Select pick a folder and confirm the folder in your device’s picker. Folder selection carries relative paths so the upload can recreate the folder structure at the destination.
- Or drag and drop. Drop files or a folder into Drop files or folders here to upload. If a folder drop is unsupported or does not include the expected files, use pick a folder instead.
- Check the queue. The Upload queue appears after files are added. Review the file names, total size and individual progress. A selected file does not count as a completed upload until its row shows Done.
- Adjust simultaneous uploads only if useful. Under Upload options, Simultaneous uploads controls how many files run together. The offered values respect a configured workspace cap. If a connection struggles under several transfers, try a lower value.
Steps: confirm completion
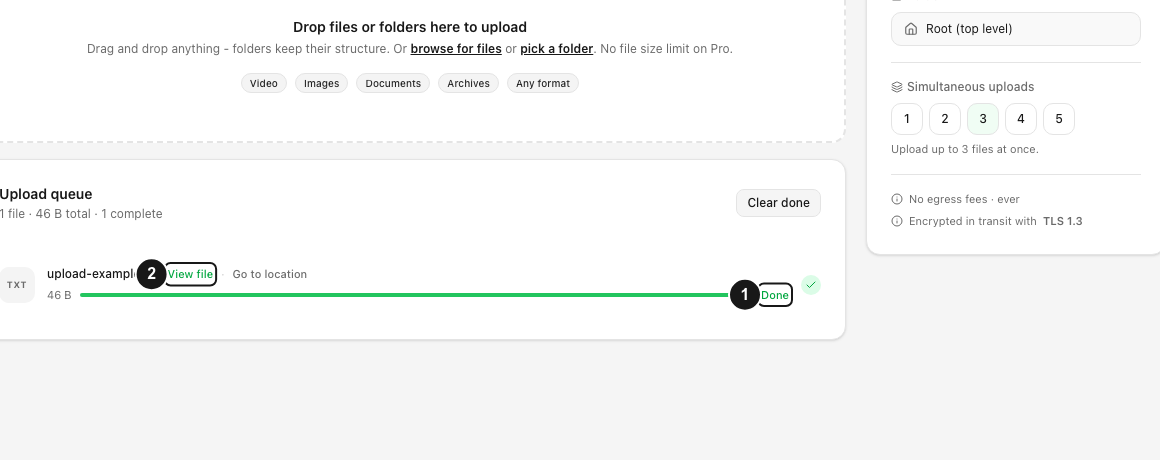
- Wait for Done. Keep the tab open until every required row finishes. Moving to another page inside the app can leave the upload dock available while the queue continues; closing or reloading the tab is a different action.
- Open the finished result. Use View file beside a completed row to find the file, or Go to location to open its containing folder.
- Check the destination. In Files, confirm the names and folder structure in the intended workspace. Open a small test file to check a new workflow.
- Clear the finished queue when ready. Clear done tidies finished queue entries. Your completed files remain in storage.
Expected result
Completed uploads appear in the chosen workspace folder. A folder selection preserves the files’ relative paths instead of flattening every file into one directory. A batch started from a group can also add completed files to that group; a group is a collection, so the files still have a folder location.
Troubleshooting and limits
If the page says Your role can’t upload files, ask the workspace owner or admin about upload permission. Repeatedly choosing the same files will not change your role.
If a row shows Error, read the reason beside it. Check connectivity, available storage and access to the destination. Use its Retry control when available, or Retry all failed for the failed queue entries. Retry does not restart the completed items.
A file’s transfer data may no longer be available after a browser reload. If Retry is disabled and its message asks you to add the file again, choose the original file from your device. Check the completed files first so you do not resubmit an entire folder unnecessarily.
Browser folder support, service limits, storage allowance and workspace policies all affect uploads. Do not infer that every format or size will be accepted from the drop area’s examples. Recoverable connection errors can be retried, but unattended completion is not guaranteed.
For a persistent issue, use private support. Include the browser, approximate file size, failing step and exact error. You do not need to post the private file itself in a public question.
Frequently asked questions
Can I leave the Uploads page while a transfer runs?
You can navigate inside the app while the global queue continues. Keep the browser tab running and check the upload dock or return to Uploads for completion. Closing or reloading the tab can interrupt the transfer.
Why are files waiting instead of uploading together?
Simultaneous uploads limits the number running at once, and a workspace can impose a lower cap. Waiting queue entries are not necessarily failures; check whether the running entries are progressing.
Does Clear done delete my uploaded files?
No. It removes finished entries from the queue display. Use View file or Go to location before clearing if you want to check where a completed file landed.
Related guides
- Creating a sharing link
- Watch the existing upload tutorial
- Why large uploads fail explains broader transfer problems.
Was this helpful?
Loading helpfulness results…
Voting saves a necessary ballot cookie for up to 180 days so you can change your answer.
Questions and replies
Ask about the steps in this guide. Questions are reviewed before publication.
Keep account details, credentials and private files out of public questions. Use private support for those.
Loading questions…
Sign in to your Dosya account to ask a question.