Creating a sharing link
Generate a link for an uploaded file, check its access settings, and copy the URL to send to your recipient.
Last reviewed
In Files, open a completed file’s Share action, choose By link, review Expires in, then select Generate link. Copy the URL shown under Share link created and test it before sending it to the recipient.
Before you start
- Sign in and select the workspace containing the file. Wait until its upload completes and confirm the file in Files.
- You need permission to share the item. Workspace policy, hidden items and locks can restrict which files you may share.
- Decide how long the delivery should be accessible, whether a password is needed, and whether downloading should be available.
- A public link can be forwarded. Anyone who has it can use it subject to the link’s access checks; it is not an invitation to become a workspace member.
Steps: open the sharing dialog
- Find the correct file. Open Files and navigate to its containing folder. Check its name before creating a public URL.
- Open Share. Use the file’s menu or share control and select Share. On supported devices, the context menu is also available by right-clicking the file.
- Choose By link. Select By link in the sharing dialog. Check the file name displayed beneath the tabs so you can confirm which item the URL will represent.
This guide follows one file; check the dialog’s target when sharing folders or multiple files.
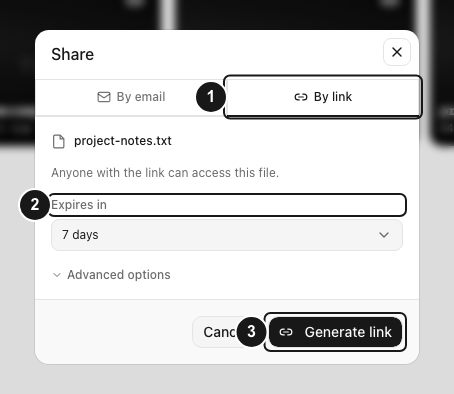
Steps: choose the access settings
- Review Expires in. Choose a duration appropriate to the delivery. The options include 1 hour, 24 hours, 7 days, 30 days, 90 days, Custom date… and Never. The workspace can supply the initial selection and apply sharing policies, so review the displayed choice every time.
- Set a custom time if needed. Selecting Custom date… reveals a date-and-time input. Enter a valid future time. Correct any validation message before generating the link.
- Open Advanced options. Use this section when you need a password, view-only access, a download limit or an optional title. Leaving an option unset should be an intentional choice.
- Choose an optional password. Password (optional) requires at least eight characters after surrounding whitespace is trimmed. See Adding a password to a sharing link for a complete recipient test.
- Review download behavior. View only. removes the download button and changes the available preview experience. It does not prevent someone from capturing what they can see. Download limit (optional) stops the link serving the file after the configured number of downloads. A small limit can also be used up by your own test download.
- Add a useful title if needed. Title (optional) can help identify the delivery.
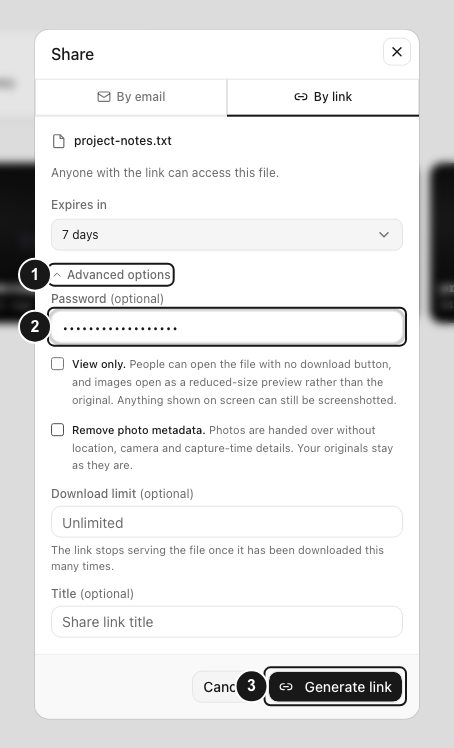
Steps: generate, test and send
- Generate the URL. Select Generate link and wait for Share link created. If an error appears, resolve it before assuming that a usable link exists.
- Copy the whole URL. Use the copy icon beside the displayed link. Check that the destination where you paste it contains the complete URL. If clipboard access fails, obtain the link again from Shared.
- Finish the dialog. Select Done after saving the URL.
- Test a fresh recipient view. Open the URL in a private browser window. Check the target file and any password prompt. If you configured a download limit, account for any test download rather than unintentionally consuming the allowance.
- Send the delivery. Send the tested URL to the intended recipient. If it is password protected, share the password separately when practical.
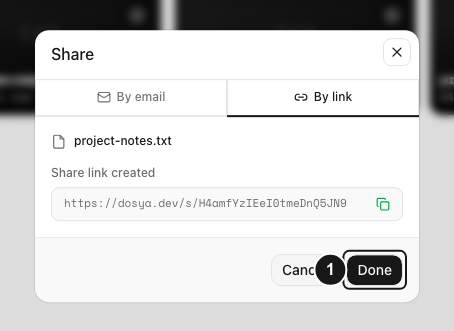
Expected result
The URL opens a public share page for the selected file without requiring an ordinary public-link recipient to create a Dosya account. Passwords, expiry, download limits and other access settings still apply. Your original file remains in its workspace.
Review or revoke the link
Open Shared to review links you have sent. The list includes Expiry and Status, with copy and revoke controls on links you manage. Find the intended link, select Revoke share link, check the confirmation, then select Revoke. Revocation cannot be undone; create a replacement when a new delivery is needed.
Different URLs can exist for the same file. Revoking or protecting one link does not automatically change the other URLs.
Troubleshooting and limits
If creation fails, confirm that the file upload finished and that your role and workspace policy allow sharing. A custom expiry must be valid and in the future.
On Free, a link creator can have up to five active sharing links, and each link expires within seven days. Choosing a longer duration or Never still results in that seven-day maximum; a tighter workspace policy can shorten it further. Revoked and expired links free an active-link slot. Check the actual Expiry in Shared before sending the URL. See the fair-use policy for current limits.
If a recipient sees an unavailable page, confirm the complete URL and check Shared for expiry or revocation. A configured download limit or an unavailable underlying file can also stop access. For an intentionally revoked or expired delivery, create a new link with the correct settings.
By email is a separate workflow. Sending a link in an email does not by itself make it email restricted; that workflow has its own recipient-verification option. Ordinary share links also remain separate from end-to-end encrypted Vault sharing.
Use private support for persistent access problems. Keep confidential URLs out of public comments.
Frequently asked questions
Does the recipient need an account?
An ordinary By link recipient can open the public share page without an account, subject to the link’s access settings. Email-restricted sharing is a different workflow.
Can I stop access after sending the URL?
Yes. Revoke the particular link in Shared. This stops subsequent access through that URL; it does not erase copies someone has already downloaded.
Does View only prevent screenshots?
No. It changes the share page’s available download and preview controls. Anything someone can see on screen can still be captured.
Related guides
Was this helpful?
Loading helpfulness results…
Voting saves a necessary ballot cookie for up to 180 days so you can change your answer.
Questions and replies
Ask about the steps in this guide. Questions are reviewed before publication.
Keep account details, credentials and private files out of public questions. Use private support for those.
Loading questions…
Sign in to your Dosya account to ask a question.