Inviting people to a workspace
Open Team, choose an email invitation or an invite link, assign a role, and check whether the invitation has been accepted.
Last reviewed
Select the workspace you want to share, open Team, then select Invite to workspace. Use Email invite for an invitation bound to a particular email address, or Invite link for a link people can use to join under the role and limits you choose.
An invitation adds someone to a workspace after they accept it. It is different from sending a link to one file.
Before you start
- Sign in and select the correct workspace in the app’s workspace switcher. Confirm the workspace name on the Team page before sending anything.
- You need the workspace’s permission to invite members. If Invite to workspace is unavailable, ask the workspace owner about your role.
- Choose the access the recipient needs. The role selector only offers roles you may grant; you cannot grant permissions beyond your own or invite someone as Owner.
- Workspace membership limits and allowed email-domain policies can restrict invitations or joins. Read any refusal message before retrying.
Steps: invite specific email addresses
- Open the workspace’s Team page. Select Team in the workspace navigation, or open Team after selecting the workspace. Confirm its name in the workspace badge.
- Open the invitation dialog. Select Invite to workspace near the page heading. A workspace with only you as a member also offers Invite someone in its empty state. Both open the same dialog.
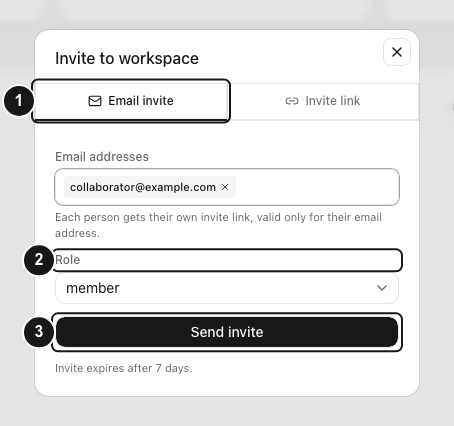
- Choose Email invite. In the Invite to workspace dialog, select Email invite.
- Add the recipients. Enter an address in Email addresses and press Enter to add it. Repeat for each person. Check the address chips and remove a mistaken address with its small remove control. Each recipient gets a separate invitation tied to that email address.
- Choose Role. Select the role each person in this batch should receive. If people need different roles, send separate batches. The page’s Role guide explains the built-in roles; custom roles may also appear in the selector.
- Send the invitations. Select Send invite. Successful requests show Invites sent. The email invitation expires after seven days. If only some addresses fail, the dialog keeps those failed addresses so you can correct or retry them.
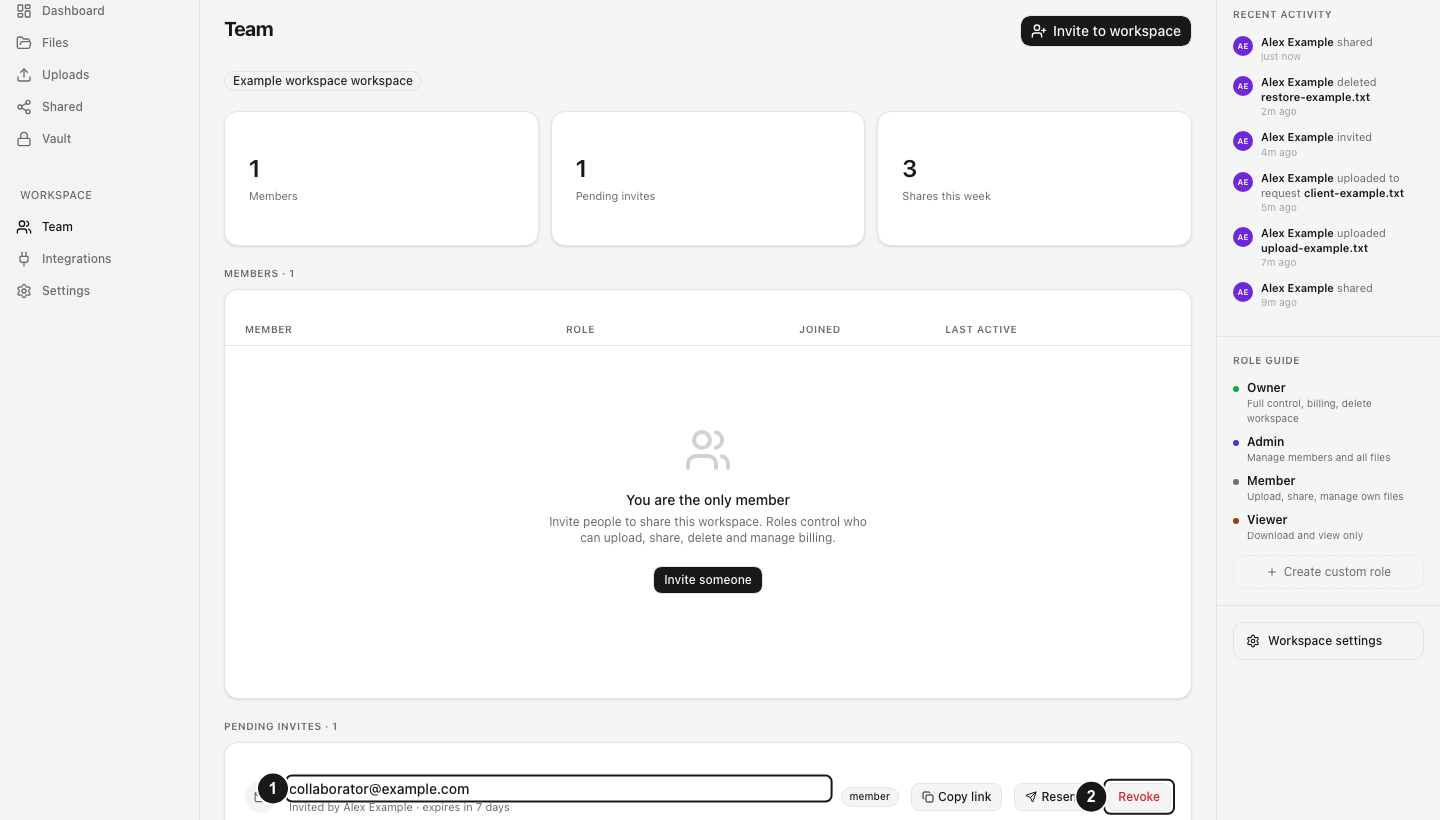
- Check Pending invites. Back on Team, find the recipients under Pending invites and check their roles and expiry. Sending an invitation does not immediately turn that recipient into a member.
- Have each recipient accept. They open their invitation, check the workspace and role, sign in or create an account using the invited email address, and select Accept invitation. After acceptance, reload Team and confirm their entry under Members.
Steps: create an invite link
- Open the same dialog. On Team, select Invite to workspace, then select Invite link.
- Set the role. Choose Role for new members. Everyone who joins through this link receives that role.
- Set the link’s limits. Choose Max uses and Expires. The expiry starts at 7 days. You can select another offered duration; Unlimited uses and Never expiry are available, so review both fields deliberately.
- Create and copy it. Select Create invite link. Under Share this link, use the copy button beside the generated URL. Send it privately to the intended recipients.
- Check joins and remaining use. The Invite links section lists the link, its role and use count. Recipients still need to sign in and accept the invitation. Workspace email-domain and membership policies can prevent a join even while the link exists.
An invite link is not bound to one recipient’s email address. Someone who receives it can forward it. Choose a role, expiry and maximum use count appropriate to that possibility.
Expected result
For an email invitation, Pending invites shows the invitation until the recipient accepts or it becomes unavailable. After a successful acceptance, Members shows the person with the assigned role.
For an invite link, the link appears under Invite links and its use count increases as eligible people join. The member’s role governs their workspace permissions.
Manage pending invitations
In Pending invites, use Copy link to send the person’s email-bound invitation yourself, Resend to request another invitation email, or Revoke to invalidate it. Email-invite revocation opens Revoke invite; check the recipient and select Revoke to confirm.
In Invite links, use Revoke to stop future joins through that link. This link action starts directly without the email-invite confirmation dialog. Revoking an invitation does not remove someone who has already become a member.
Limitations
- A successful invitation request does not prove that an email has reached the recipient’s inbox. Check the pending row and use its copy or resend controls when delivery needs attention.
- Only the invited email address can accept an email invitation. An invite link uses a different joining workflow.
- Invitation controls do not transfer workspace ownership. Owner is not an invitation role.
- The invitation dialog selects a role, not a folder restriction. Members with the separate role-management permission can configure a member’s folder access afterward; do not assume an invitation is folder-limited.
- Plans and workspace policies can limit membership. An invite link does not bypass those restrictions.
Troubleshooting
If you see An invite is already pending for this email, find the existing row and use Copy link or Resend. If the person is already a member, review their member entry instead of repeatedly inviting them.
For an expired or revoked email invitation, issue a fresh invitation after checking the recipient and role. If Resend reports a cooldown, wait as directed by the message. If sending is rate-limited, retry later rather than repeatedly submitting the same addresses.
If a recipient cannot accept, check that they signed in with the invited address, that the link is still valid, and that the workspace’s member and email-domain policies allow them to join. Use private support for a persistent access problem. Include the workspace name and error message; do not post live invitation URLs in public comments.
Frequently asked questions
Can I invite someone who does not have a Dosya account?
Yes. They can create an account before accepting. For an email-bound invitation, that account’s email address must match the invitation.
Why is a role missing from the invitation selector?
You can only grant roles whose permissions fit within your own. The workspace’s owner can review the role or send the invitation. Ownership itself is transferred through a separate workflow.
Does revoking a link remove people who used it?
No. Revocation prevents subsequent acceptance or joins. A person who already joined is a workspace member; review that member’s access separately.
Related guides
Was this helpful?
Loading helpfulness results…
Voting saves a necessary ballot cookie for up to 180 days so you can change your answer.
Questions and replies
Ask about the steps in this guide. Questions are reviewed before publication.
Keep account details, credentials and private files out of public questions. Use private support for those.
Loading questions…
Sign in to your Dosya account to ask a question.