Turning on two-factor authentication
Find Password & 2FA, connect an authenticator app, save your recovery codes, and manage your second sign-in step.
Last reviewed
Open Profile → Password & 2FA to add an authenticator app to your account. Setup is complete only after you enter an app-generated code and select Verify & enable. Save the recovery codes before closing the setup dialog.
Before you start
- Sign in to the account you want to protect. These settings apply to your account, rather than only the selected workspace.
- Have an authenticator app that supports time-based, six-digit codes available on your device.
- Have somewhere private to save recovery codes, such as a password manager you can reach if you lose your authenticator device.
- Your account needs a password for this web setup. If you first signed in with Google, GitHub or Apple and see Not set beside Password, select Set a password, enter New password and Confirm new password, and finish that dialog. The password must be at least eight characters. Reload the page if the setup controls do not appear after saving.
Steps: connect an authenticator app
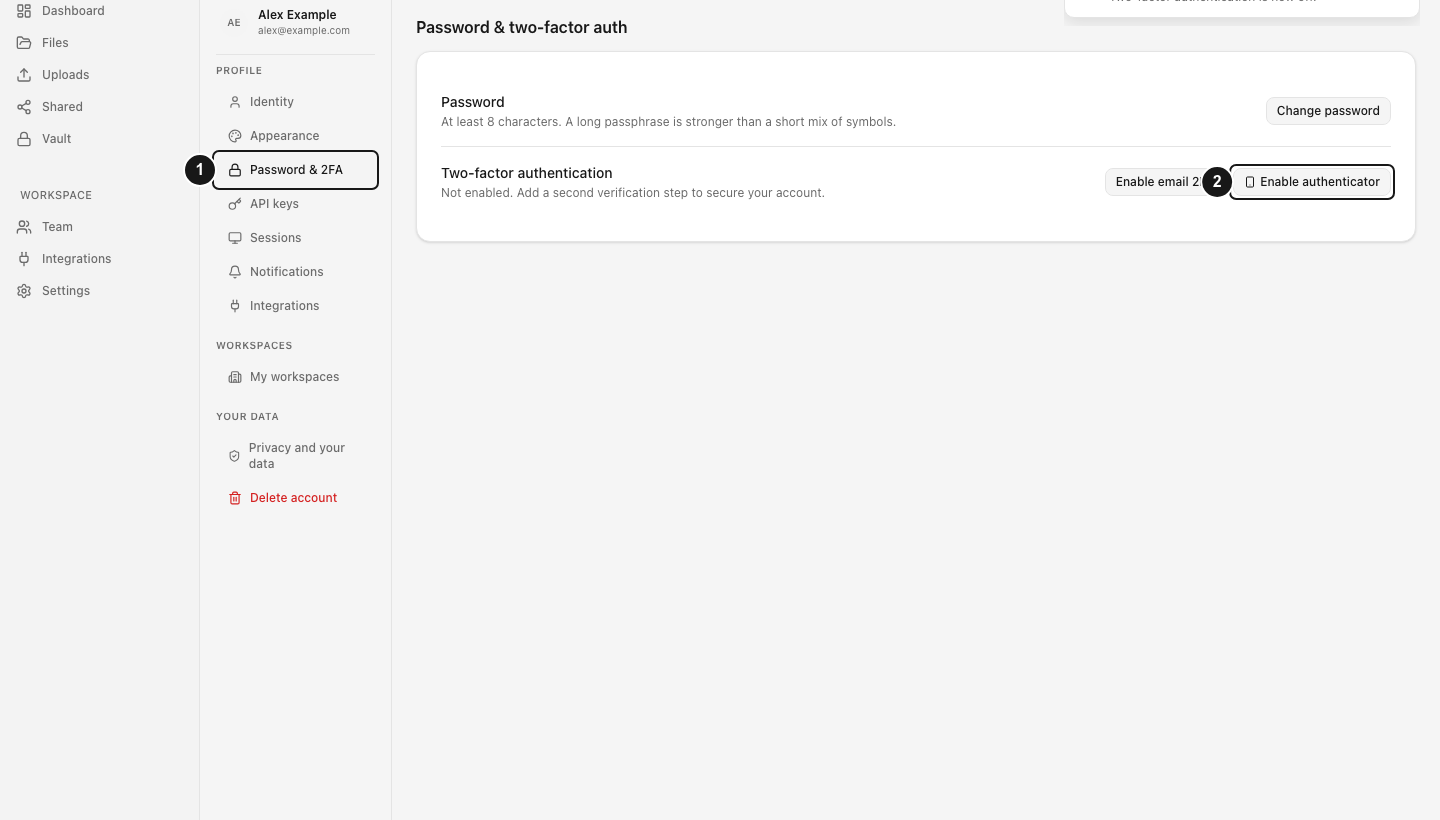
- Find the security settings. Open the avatar’s Account menu in the app’s top bar, select Profile, then select Password & 2FA in the profile navigation. You can also open Password & 2FA directly. The page heading reads Password & two-factor auth.
- Start setup. In the Two-factor authentication row, select Enable authenticator. The Set up authenticator app dialog displays a QR code and a setup secret.
- Add the account to your authenticator. Use the app’s account-add control to scan the displayed QR code. If you cannot scan it, use the app’s manual setup option with the secret shown beneath the QR code. Keep the QR code and secret private.
- Confirm the connection. Enter the authenticator’s current code in 6-digit code, then select Verify & enable. Opening the QR dialog alone does not enable two-factor authentication.
- Save your recovery codes. When the dialog changes to Recovery codes, use Copy all or Download to save them privately. Download creates a text file named
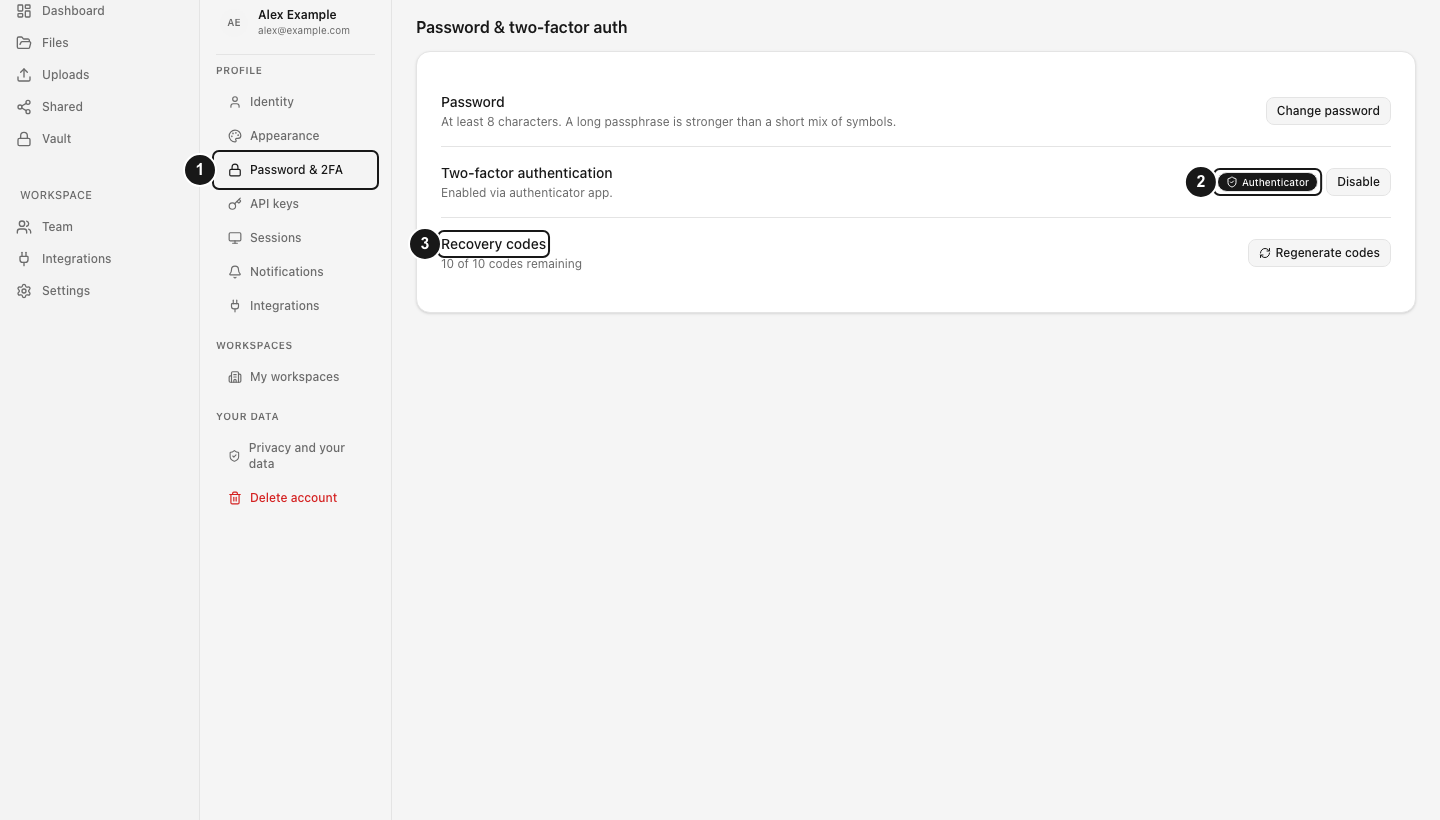
dosya-recovery-codes.txt. Each code can be used once if you lose access to the authenticator. - Finish and check the status. Select Done. The account settings should show Authenticator, Enabled via authenticator app., and a Recovery codes row showing the remaining codes.
Expected result
Authenticator-based two-factor authentication is enabled. When a sign-in asks for a second verification step, enter the current six-digit authenticator code on the Two-factor authentication page and select Verify.
If you cannot use the authenticator at that point, select Use a recovery code instead, enter an unused code in Recovery code, and select Use recovery code. Mark that code as used in your saved copy.
Replace recovery codes or turn 2FA off
To replace the recovery set, return to Password & 2FA, select Regenerate codes, enter Current password, and select Regenerate. This invalidates the previous codes. Save the new set with Copy all or Download, then select Done.
To turn off the second step, select Disable in the Two-factor authentication row, enter Current password, and select Disable 2FA. Check for the Disabled message and the settings row’s updated status.
Limitations
- Account two-factor authentication and Vault encryption are separate features. Enabling 2FA does not move files into the Vault or change their encryption workflow.
- Recovery codes are for authenticator-based 2FA. They are not an account password or a Vault recovery credential.
- The page also offers Enable email 2FA. If email enrollment fails, use the authenticator workflow or contact private support.
- Enabling 2FA does not replace reviewing existing signed-in devices. See Reviewing active sessions.
Troubleshooting
If Verify & enable remains unavailable, enter all six digits. If verification fails, use a fresh code from the correct authenticator entry and check your device’s time settings. If the app says to start setup first, close the dialog and begin again from Enable authenticator.
If you cannot disable 2FA or regenerate codes, use your current Dosya account password. The password for a linked Google, GitHub or Apple account is a separate credential.
If you are signed in, use private support. If you cannot sign in, use the public contact form instead. Describe the failing step and its error message. Never send your password, setup QR code, setup secret, current verification code or recovery codes.
Frequently asked questions
Is scanning the QR code enough to enable 2FA?
No. Enter the authenticator’s code and select Verify & enable. The recovery-code screen and updated Authenticator status confirm that setup progressed beyond scanning.
Can I see my original recovery codes again later?
The settings page shows how many remain; it does not reveal the original set. If you are signed in and have your account password, use Regenerate codes to replace them. Save the replacement set because the old codes stop working.
What if I lose my authenticator device?
Use an unused saved recovery code at the sign-in verification step. If you are still signed in on another device, keep that session available while reviewing your recovery options. Private support can help investigate an access problem; this guide does not promise a bypass of account verification.
Related guides
Was this helpful?
Loading helpfulness results…
Voting saves a necessary ballot cookie for up to 180 days so you can change your answer.
Questions and replies
Ask about the steps in this guide. Questions are reviewed before publication.
Keep account details, credentials and private files out of public questions. Use private support for those.
Loading questions…
Sign in to your Dosya account to ask a question.